
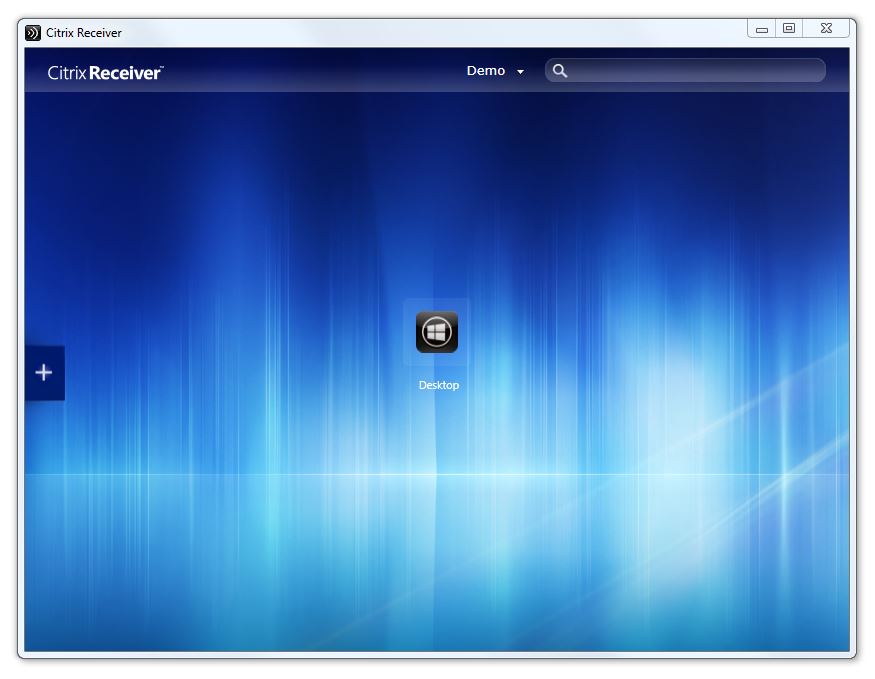
customizing Citrix frontends like Storefront or Netscaler has been done since a long time and is pretty well documented on the internet. but what about the windows receiver itself? in osx you can simply edit the resources of the receiver.app (show package contents) but on windows its not that easy.
in a recent training from my company, we customized the usual Citrix components and because i wanted to adapt my local receiver to the same look, i spent some time to find out how i can do that. this involved reverse engineering and some special tools – but in the end i have found a way.
CAUTION: this is not supported by Citrix and requires modification of the Citrix Receiver binaries!
here is a guide, how i managed to change the background image of the Citrix Receiver for Windows:
- download ILSpy with Reflexil here (original source: http://reflexil.net) – ILSpy is a free .NET decompiler and Reflexil is an addon that lets you change .NET code without having its sources. this package includes both tools already.
- download Resource .NET here (original source: http://fishcodelib.com/Resource.htm) – Resource .NET is an editor for compiled .resource (.NET) files.
- now lets begin: run ilspy.exe and open SelfService.exe (usually located at “C:\Program Files (x86)\Citrix\SelfServicePlugin\SelfService.exe”) – make sure Citrix Receiver is not running.
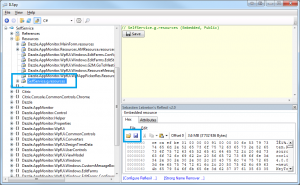
- in the treeview expand “SelfService”, “Resources” and select “SelfService.g.resources” – from the menu select “View”, “Reflexil v2.0” and it will display Reflexil at the bottom of ILSpy including a hex view.
- in Reflexil, click the little disk icon to save the “SelfService.g.resource” to disk (or use File -> Save to file from the menu above the Hex view).
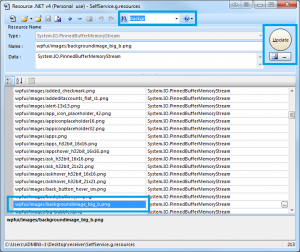
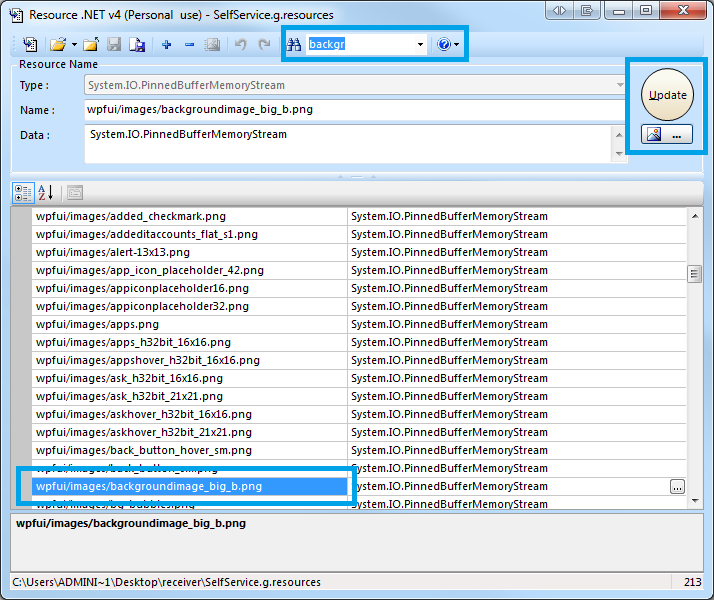
- now open the second tool “Resource .Net” and load the “SelfService.g.resource” file from step 5.
- locate “wpfui/images/backgroundimage_big_b.png” manually or use the search function to find it.
- use the image selector button (the one under the round Update button) to load your desired replacement image (i only tested png files) – the size can actually be different, but its probably the best to use an image with the same resolution (2048 x 1536).
- click on the Update button and use the disk symbol to save the modified “SelfService.g.resources” file.
- back in ILSpy select the “Load from Disk” icon or use “File -> Load from file” from the menu above the Hex view and select the modified “SelfService.g.resources” from step 9.
- in the treeview, right click SelfService and select Save As – Reflexil will give you the filename “SelfService.Patched.exe” – just save it like that and backup your original SelfService.exe before you rename the patched one.

thats it! now rename the SelfService.Patched.exe to SelfService.exe and run it.
i did additionally replace the images with the + sign on it, because they were green and didnt match the blue background. you can find those with the names: “wpfui/images/plussign_tab_hover_40px.png” and “wpfui/images/plussign_tab_normal_40px.png”.
actually you can replace whatever you want with this method and in ILSpy you can even preview the images when you expand the “SelfService.g.resources” in the treeview.
this even works with the newest technical preview of the Receiver X1, but Citrix placed the SelfService.exe into the “ICA Client” folder instead of “SelfServicePlugin”.
dont move the SelfService.exe from its original location when you modify it, or the final step will not work. Reflexil needs the dependencies (dll’s) and if you move the exe somewhere else, it cannot find them and saving the modified binary will fail.
enjoy!
Coole Anleitung! Vielen Dank.
This is the only page I have found to help with this. Awesome process.
Just wondering how you packaged it back into the original installer ready for deployment?
hey there. sorry for the long delay… i was out of my country. actually i wasnt able to repackage it in the original installer… but you could do something like an executable zip, if you want to automate it.
Well dodgy.
Christoph, thank you very much! Very helpful.
One question: how did you change color of “+” sign? Where did you find its image in blue? What are its dimensions?
actually thats described in the same article: wpfui/images/plussign_tab_hover_40px.png
but instead of using the green bubble theme, you could switch to X1 and then customize it with the storefront options
that’s not what I asked about… I mean, background image size is 2048×1536, and what are the required sizes of those “+” images?
i just checked and they are 40×126 – i just used the original images and some filtering in paint.net to make them blue
thank you! Is there any way to extract all these images files from SelfService.exe?
sadly i didnt find a tool which does all at once… im sorry.